Our Books: Draw Write Now

Draw Write Now was created for the primary grades, ages five to nine. The lessons are used in preschools, multi-age classes, homeschools and upper elementary classes. Four year-olds and 12 year-olds enjoy doing the lessons together. They have received numerous awards.

Draw Write Now books are NOT workbooks. The series becomes a part of your home or classroom library, to be used many times. Children draw and write on their own paper or may draw and write in the Draw Write Now Workbook (a blank book.)

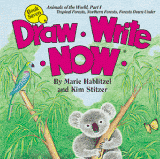
The Draw Write Now books are numbered 1 through 8, but may be used in any order. The numbers—Book 1, Book 2, Book 3, etc.—do NOT relate to grade level. Draw Write Now, Book 1 has the easiest lessons. If a child is confident with their drawing skills, they may start in any of the books. 

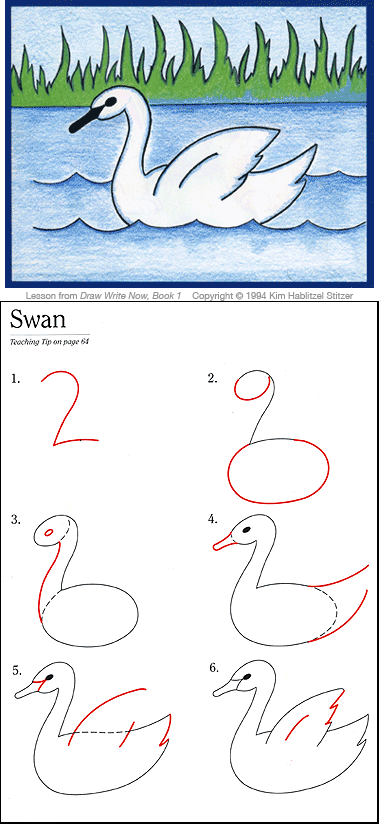
Download the Swan Lesson from Draw Write Now, Book 1 and the Heron Lesson from Book 6.

Both lessons are similar, but the Heron Lesson includes more details. The lessons in Book 1 are lessons Marie used with her students at the beginning of the school year and Book 8 are lessons she gave at the end of the school year.  (pdf, 5.1 MB) 


Bridge Lesson: Draw Your World

Rachel, age 5

Rachel, age 5

Architectural structures in your community are excellent subjects for children to  draw. I live near the Tacoma Narrows Bridge in Washington State. In 2007, a new bridge was built alongside it. We watched the new bridge go up and learned about bridge engineering and construction, which of course, led to a drawing lesson. This lesson is NOT in a Draw Write Now book—the children and I were simply drawing our world!

Basic Bridge Construction

  • The basic parts of a suspension bridge: towers, main cables, anchorage, suspender cables, road deck.
  • Artistic styles influence engineers as they design a bridge.

Bridge History


University of Washington Libraries, Special Collections FAR165, used with permission 

University of Washington Libraries, Special Collections FAR165, used with permission 

Drawing Lesson: Suspension Bridge

Materials

Prepare the Paper

Paper clip or tape the tracing paper onto the tower template. (The template is removed in Step 6 and the white paper is taped to the back of the tracing paper. The drawing will be completed on the tracing paper.)


drawyourworld.com, Draw a Suspension Bridge, Tacoma Narrows

drawyourworld.com, Draw a Suspension Bridge, Tacoma Narrows

drawyourworld.com, Draw a Suspension Bridge, Tacoma Narrows

drawyourworld.com, Draw a Suspension Bridge, Tacoma Narrows


A Suspension Bridge Near You

Bridgemeister.com —See suspension bridges from your neighborhood and from around the world!

Bridgemeister.com —See suspension bridges from your neighborhood and from around the world!


Stephanie, age 10

Stephanie, age 10

Andrew

Andrew


Simple World Map: Draw-Write-Now 7

Draw a Simple World Map

Geography for Life: The National Geographic Standards, 1995, stressed the importance of children knowing how to draw a map of the world. It suggested using simple ovals for each continent. We loved the idea and created a lesson for Draw Write Now, Book 7. It is available here as a free download.

The Common Core State Standards recommends that students “use a mix of drawing, dictating and writing to compose explanatory texts.” Drawing a simple world map helps children develop their own mental map, always at the ready as they build an understanding of our world. It’s easy to see how drawing a simple map can add to the ability to use explanatory texts.
(2 page pdf, 674 KB)


Swan Lesson, Draw-Write-Now, Book 1

Draw Your World: Swan Drawing Lesson from Draw-Write-Now, Book 1.

Draw Your World: Swan Drawing Lesson from Draw-Write-Now, Book 1.

The lessons are simple and clean. This is how the swan lessons appears in Draw-Write-Now, Book 1. CLICK IMAGE TO ENLARGE 

TEACHING TIPS

Our lessons are flexible and simple. Keep it easy—pick up a lesson and draw! All that is needed is a pencil, eraser, paper and crayons (or a coloring medium of your choice.)

1.) Introduce the Subject

Garner interest in wild or domestic swans with a story, discussion, poem, photos or a song. 

2.) Draw the Subject

Using a pencil, encourage the children to draw the swan lightly, because some lines will be erased (see Step 3.) Use the step-by-step instructions—the red lines—to draw the subject. Throughout the building of the swan, refer to the color drawing, pointing out the shapes and lines.

3.) Draw the Background

Still working in pencil, encourage the children to create their own background for the drawing. If they want to copy what they see in the sample color drawing, that's fine. With time and a little encouragement, their own creativity will take hold.

4.) Practice Writing

See Drawing and Writing Together. Scroll down the list and find where your child fits. Is your child just learning to write letters? Are they able to write, but don't like to practice? Do they need to work on forming paragraphs? Children of varying ages and skill levels can work together during drawing time, and at their own pace during writing time.

5.) Color the Picture

This is the fun time! The child colors their creation. You may notice that the drawings shown in our Gallery are outlined in black. Introduce outlining and see how it helps preserve the details the child has so carefully drawn in pencil. It also makes colors pop!

Practice writing sentences, learning to write letters, or crafting a paragraph.

Practice writing sentences, learning to write letters, or crafting a paragraph.


Whale Lesson, Draw-Write-Now 4

Draw Write Now, Book 4: Whale lesson

Draw Write Now, Book 4: Whale lesson

The lessons are simple and clean. This is how the swan lessons appears in Draw-Write-Now, Book 1. CLICK IMAGE TO ENLARGE 

TEACHING TIPS

Our lessons are flexible and simple. Keep it easy—pick up a lesson and draw! All that is needed is a pencil, eraser, paper and crayons (or a coloring medium of your choice.)

1.) Introduce the Subject

Garner interest in the blue whale and the animals and people who live in the polar regions with a story, discussion, poem, photos or a song. 

2.) Draw the Subject

Using a pencil, encourage the children to draw the whale lightly, because some lines will be erased (see Step 3.) Use the step-by-step instructions—the red lines—to draw the subject. Throughout the building of the whale, refer to the color drawing, pointing out the shapes and lines.

3.) Draw the Background

Still working in pencil, encourage the children to create their own background for the drawing. If they want to copy what they see in the sample color drawing, that's fine. With time and a little encouragement, their own creativity will take hold.

4.) Practice Writing

See Drawing and Writing Together. Scroll down the list and find where your child fits. Is your child just learning to write letters? Are they able to write, but don't like to practice? Do they need to work on forming paragraphs? Children of varying ages and skill levels can work together during drawing time, and at their own pace during writing time.

5.) Color the Picture

This is the fun time! The child colors their creation of the Blue Whale. You may notice that the drawings shown in our Gallery are outlined in black. Introduce outlining and see how it helps preserve the details the child has so carefully drawn in pencil. It also makes colors pop!

Practice writing sentences, learning to write letters, or crafting a paragraph.

Practice writing sentences, learning to write letters, or crafting a paragraph.


Tiger Lesson, Draw-Write-Now 7

Draw Write Now, Book 7, Tiger Drawing Lesson for Children

Draw Write Now, Book 7, Tiger Drawing Lesson for Children

The lessons are simple and clean. This is how the Tiger Lesson appears in Draw-Write-Now, Book 7. CLICK IMAGE TO ENLARGE 

TEACHING TIPS

Our lessons are flexible and simple. Keep it easy—pick up a lesson and draw! All that is needed is a pencil, eraser, paper and crayons (or a coloring medium of your choice.)

1.) Introduce the Subject

Garner interest in tigers and the animals living in tropical forests with a story, discussion, poem, photos or a song. 

2.) Draw the Subject

Using a pencil, encourage the children to draw the tiger lightly, because some lines will be erased (see Step 3.) Use the step-by-step instructions—the red lines—to draw the subject. Throughout the building of the subject, refer to the color drawing, pointing out the shapes and lines.

3.) Draw the Background

Still working in pencil, encourage the children to create their own background for the drawing. If they want to copy what they see in the sample color drawing, that's fine. With time and a little encouragement, their own creativity will take hold.

4.) Practice Writing

See Drawing and Writing Together. Scroll down the list and find where your child fits. Is your child just learning to write letters? Are they able to write, but don't like to practice? Do they need to work on forming paragraphs? Children of varying ages and skill levels can work together during drawing time, and at their own pace during writing time.

5.) Color the Picture

This is the fun time! The child colors their creation. You may notice that the drawings shown in our Gallery are outlined in black. Introduce outlining and see how it helps preserve the details the child has so carefully drawn in pencil. It also makes colors pop!

Practice writing sentences, learning to write letters, or crafting a paragraph.

Practice writing sentences, learning to write letters, or crafting a paragraph.